
As promised – a tutorial on how to make this postcard. It’s very easy, beginner friendly, and can be quite cute:) Of course, you can make it in any theme you’d like: seashells, ships, sea, and fish would be nice for a vacation card but I chose a flower for our gardening granny;). You can make these with kids because they are so easy to make and only use non-toxic materials:). Nothing fancy but so much fun! Enoy in sprinkling joy over the world;).
Category Archives: crafts
Watercolour Postcards

Every year we make postcards when we’re at the seaside. When we were kids we were sending postcards from wherever we traveled – everybody did it: kids, teens, and adults. We all signed each other’s postcards and had great fun reading and writing them. And it was always nice to come home to a mailbox full of postcards or get them waiting on your desk because parents were home earlier or get them in the middle of the school year sometimes since they traveled so long from far away lands. “Have you gotten my card yet?” was the usual conversation starter back in the day…

While I love email and it’s the practicality of immediate response, there is something magical about slow mail. I love the tactile quality of it and the hidden messages – the shaky handwriting when we wrote it on the boat or on the train, the quick signing of some friends, and the shy small signage, squeezed in the corners of others… The faded lines of pens on their last breath, the different colours of signage when everybody wrote cards together… There are so many things hiding in those few words that fit onto a card (or many words – I always ran out of space:D)

So I invite you to send a card to a friend – they will love it, I can guarantee:) If the cards are not very appealing where you live or where you are on holiday or if you want to change things up – make the cards yourself – I will show you how to do that tomorrow so come back:). It’s easy and it’s free:).
Handmade giftwrap

I’ve been absent this last week but for a good reason – we had family vaccination and celebrated 2 birthdays! We usually celebrate their birthdays at the seaside where a single grocery store carries no paper whatsoever, no notebooks, not even copy paper, let alone wrapping paper. You can only dream of a craft store here – it’s remote so you can buy about 10 basic cooking ingredients here (and they are priced 10x :D) but that’s it :D. So my DIY watercolour collage paper came to the rescue.
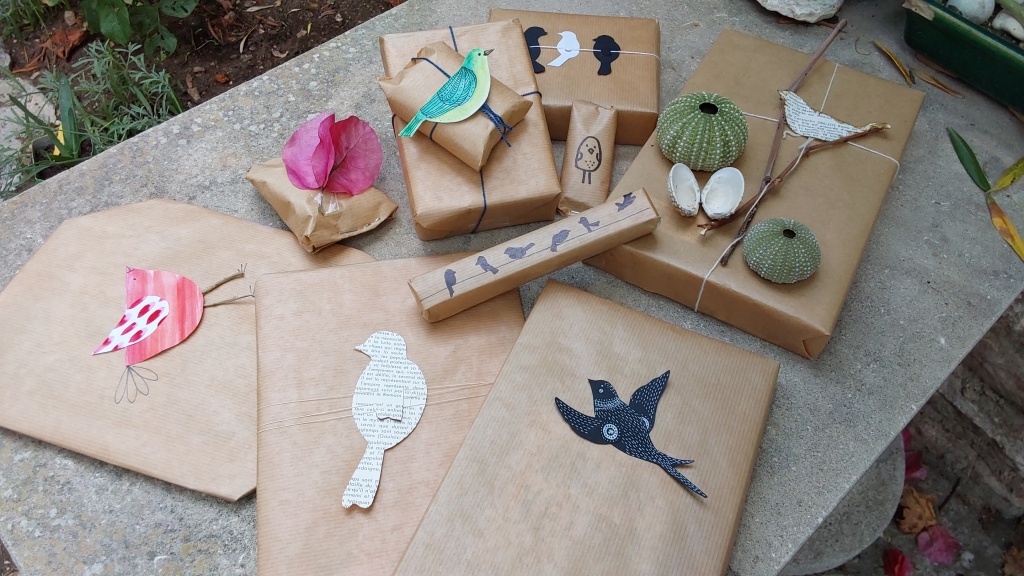
I always wrap their presents at home beforehand – this has the added benefit that the recipients can’t accidentally see what’s inside the gift while I pack and unpack;). I usually use simple brown paper because it takes traveling the best and is the most versatile to decorate later on (and I can draw on it or use it in collage afterward ;). It’s also recycled, recyclable and inexpensive (as well as biodegradable) which is also nice:).

I wrap the gifts but I don’t decorate them at home. If I was to add anything on top before the travel the little decorations would get smushed and peeled off or the gifts would take up much more space – none of that is acceptable when we travel with 3 kids;). So I wrap the gifts in brown paper, put them in a suitcase and that’s it.

But plain brown paper wouldn’t cut it for the gift wrap, right? We have to decorate it a bit – especially for the kiddo;) She loves birds so I decided to go with the bird theme.

If you’ve seen my last video on watercolour exercises I made quite a few collage papers I could use to play around. So I did. I cut out primitive birds from this painted copy paper, from an old book no one needs and added some natural material found on the floor (literally:D), some doodles with a black and white pen, and a string from a big bag of flour that we carried with us and that was it.

The reason I’m writing this is to encourage you to see things differently – little things on the floor can be beautiful ornaments, a plain brown paper can be the best background to play with, and gift wrapping can be fun and very inexpensive – tailored to the recipient and made from solely recycled and natural materials – and it will still look good! You don’t need to sacrifice the beauty and joy of kids’ unwrapping gifts if you don’t want to buy fancy and often unrecyclable papers;) – gift wrap is often plastic coated.

The last gift was a scrunchie and I found this gift wrap idea on Pinterest (where else;) – so I just painted a girl on a piece of card from pasta (yes, we eat A LOT of pasta, I always have cards from boxes of pasta – Barilla has nice white or recycled brown inside – very useful bytheway:). And she was so happy! This was all literally made from scraps – we don’t need that much to be happy – not even teenagers;). Everyone says teens just want money but my teens said they would be so disappointed if they got money from me. They are strange creatures and prefer old pasta boxes and scraps of fabric I guess :D. Maybe you have some strange creatures in your life – who knows – try it with a brown paper bag and some natural materials;).
Mini Fairy from Polymer Clay Tutorial

As promised yesterday – here it comes – a tutorial on how to make this cute little fairy:). You can use it in a number of ways: as a quick thank you gift for teachers, kind strangers who helped you out or a “just because” gift to your friends, as an addition to your fairy garden, as a decoration on a gift or a card, to add some magic to your doll house,…
They make perfect teacher gifts, additions to nature corner, they add magic to your dollhouse and make your friends happy as a “just because gift”. I hope you like it – if you do, subscribe for more:).

Mini Fairies

We’ve made our fairy garden last week – but something was missing… Every fairy garden needs fairies, right? So this week I made some… Well, quite some… And some more are in the making :D…

A girl can easily go overboard with these mini fairies. They are so cute and tiny – you don’t need a lot of material for them so they very inexpensive to make:) but bring so much joy to the recipients – that’s the kind of craft I love the most:). I’ll show you how to make them tomorrow, pinkie promise:)
Fairy Garden Accessories


Fairy gardens

What are fairy gardens you might ask? Initially, they were mini gardens with mini plants that were planted in very pleasing compositions and flowers were chosen for their delicate blooms that will attract fairies. Later on, that definition expanded to any mini diorama that involves tiny things that could be used by small magical creatures.

These on the pictures are not mine (mine are coming to the blog tomorrow – they are not that fancy or elegant but they are inexpensive) but I wanted to show you some other examples of fairy gardens – those were made by a lady in our craft shop and use plastic plants and mostly manmade materials (metal chairs, wooden bridge) but the compositions are really nice and this can be a good way to start if you don’t know how to go about it

Fairy gardens can be made in a clay pot, a wheelbarrow, a saucer, a teacup wherever. If they will accommodate live plants think of the size because you will have to find a sunny place for it;). If you will use plastic you don’t have to worry about that (I don’t like plastic flowers but you do you).

Than you build a diorama with either natural materials like stones, pine needles, soil etc… or fake moss. Into that you can add fairy houses, bridges, fountains, wells, campfires, ladders,… whatever your heart desires. You can add small little details that fairies like to use (like a tiny watering can) and of course, you can add fairy sculptures – or just wait for the real fairies to come;). Tomorrow you’ll see how to make a nice well, fence and ladder for your fairy garden so stay tuned:).
Slow Stitching

I’ve mentioned this in my “Art on the budget” post but this is really easy and accessible activity that almost anyone can do. We all have scraps of old clothes, most of us have some thread and offcuts of different kinds (like crochet samples bellow, a stone and some thread that unravelled from something but looked so nice I had to save it “for later” – now that later has come – who says I don’t use stuff up? :D)

There are no rules – you can use embroidery stitches or just go with the flow. You can add natural materials or use up your sewing supplies – whatever works. The best thing about this kind of projects is that you can use up the threads that you can’t use otherwise because they are old and break so won’t hold anything together. But for decorative purposes they are just fine:).

I’m not a very zen like person but you can do this in any state and it really is relaxing:). Unlike untangling the serger’s threads when starting sewing:D.
May Weekly Bujo

Here are my weeklies for May bullet journal – this month I didn’t complicate at all and just used stamps throughout the month – I’ll explain why in the video (hint: bleeding paper;).

The sun was shining and I didn’t find a nice shade so the pictures are not the best but you’ll get a video tomorrow to see the process anyway (with no light spots;)

This month I only used a couple of supplies:
– Pitt pen fine liners and
– Pitt brush pen in sanguine colour and
– a stamp set with bees
– Archival ink in Orange blossom
* optional: watercolour in English red or sanguine or terra rosa for accents

You could use any kind of stamps – if you want a bee themed bujo, choose bees but other themes would work as well. These spreads are really really easy for an absolute beginner to create so give them a try:).
* There are two other spreads tomorrow in the video;).
Art on a budget

This is not a post about sales and how to bargain hunt. I have no idea about that so I’ll leave that to more savvy. You won’t find many garage sale tips here simply because I know nothing about garage sales (we don’t have that here). But I have been making art on the budget for years and years… I was working part time and we had three little kids in day-care so you can imagine;). And art and craft supplies are notoriously expensive (especially in Europe). “So what can poor girl do…” as the song goes (I apologize if there is any younger audience who doesn’t get my ancient music references;).

Here are some ideas how to stretch your dollar when creating use
– recycled materials (post coming up): clothes, packaging, cardboard…
– natural materials (post coming up): for textures, surfaces,…
– cheap art materials: kids’ art supplies, knockoffs,… – know where to save: some things are more important than others: buy good brushes (they last;) but cheaper paint (student grade is perfectly good). Buy good quality paper for some things and practise on scraps.
– things that are not made for art and are therefore cheaper;) – foam and alcohol from DIY store, textures from cosmetics/hygiene products etc…
– homemade alternatives (craft recipes and DIY art and craft tools)

And 2 additional ideas:
* buy things (like stamps etc) that are versatile and will last for many projects (general things like stars and flowers for stamps and general the most basic shapes like circles and ovals for punches or die-cuts) and if you do buy themed stuff, choose a theme you really love and will use often (don’t do what I do: I am a sucker for anything sea-themed;) but I rarely use it since we’re never home during summer :D)
* choose materials that last (watercolours don’t go bad, acrylics do); brushes and paper can wait a long time but polymer clay will be hard as hell after a few years. It’s still usable but very very hard to work with. Save yourself some trouble;).

