
Let’s put together a cute little sea-themed bento for the little ones in your life (or even for the bigger ones who love the sea:). You don’t need any special equipment for this, you can cut everything with a knife but I show you a nice trick with a cookie cutter, too. So check the video and enjoy the rest of the summer!
Tag Archives: kids joy
Bento

What is bento, you might ask? Well, simply put, that is a nicely decorated meal that you take to school or work (and you get a tutorial on how to make one tomorrow;). It usually consists of all main categories of food: carbohydrates (originally rice but now it can be anything from bread to potato, pasta, whatever), protein (originally usually fish, nowadays also meat, milk products like cheese and yogurt, nuts…), lots of vegetables and fruits.

Dessert is optional but needless to say, I often included it (we all have a sweet tooth and homemade dessert is usually not that unhealthy;) although I sometimes include something else as well (like a piece of chocolate).

This approach worked well for me because I wanted my kids to have a balanced meal – but that is more important while kids are little. The funny thing is – now they do it themselves:).

Bento was traditionally just a layer of rice with some meats or fish and veggies aesthetically placed on top that Japanese wives made for their husbands when they went to work.

But in recent years it became very popular among moms who make sometimes very elaborate lunches for their kids for school lunches.

It is not known in our country because kids have lunch at school (and many workplaces have kitchens or restaurants nearby) but I still made it for my kids since they weren’t fond of school lunch and the homemade version was healthier.

It was also a way to get my kiddo through a period of adapting to school – she was looking forward to her bento – I made a bento with foods that started on one letter that they were learning that week each week (she usually went home early and only ate lunch at school when she had extracurricular activities afterward). But more on that on Sunday when you’ll get some ideas about different bentos and what to take into account;).
Tutorial – DIY postcards

As promised – a tutorial on how to make this postcard. It’s very easy, beginner friendly, and can be quite cute:) Of course, you can make it in any theme you’d like: seashells, ships, sea, and fish would be nice for a vacation card but I chose a flower for our gardening granny;). You can make these with kids because they are so easy to make and only use non-toxic materials:). Nothing fancy but so much fun! Enoy in sprinkling joy over the world;).
Watercolour Postcards

Every year we make postcards when we’re at the seaside. When we were kids we were sending postcards from wherever we traveled – everybody did it: kids, teens, and adults. We all signed each other’s postcards and had great fun reading and writing them. And it was always nice to come home to a mailbox full of postcards or get them waiting on your desk because parents were home earlier or get them in the middle of the school year sometimes since they traveled so long from far away lands. “Have you gotten my card yet?” was the usual conversation starter back in the day…

While I love email and it’s the practicality of immediate response, there is something magical about slow mail. I love the tactile quality of it and the hidden messages – the shaky handwriting when we wrote it on the boat or on the train, the quick signing of some friends, and the shy small signage, squeezed in the corners of others… The faded lines of pens on their last breath, the different colours of signage when everybody wrote cards together… There are so many things hiding in those few words that fit onto a card (or many words – I always ran out of space:D)

So I invite you to send a card to a friend – they will love it, I can guarantee:) If the cards are not very appealing where you live or where you are on holiday or if you want to change things up – make the cards yourself – I will show you how to do that tomorrow so come back:). It’s easy and it’s free:).
Handmade giftwrap

I’ve been absent this last week but for a good reason – we had family vaccination and celebrated 2 birthdays! We usually celebrate their birthdays at the seaside where a single grocery store carries no paper whatsoever, no notebooks, not even copy paper, let alone wrapping paper. You can only dream of a craft store here – it’s remote so you can buy about 10 basic cooking ingredients here (and they are priced 10x :D) but that’s it :D. So my DIY watercolour collage paper came to the rescue.
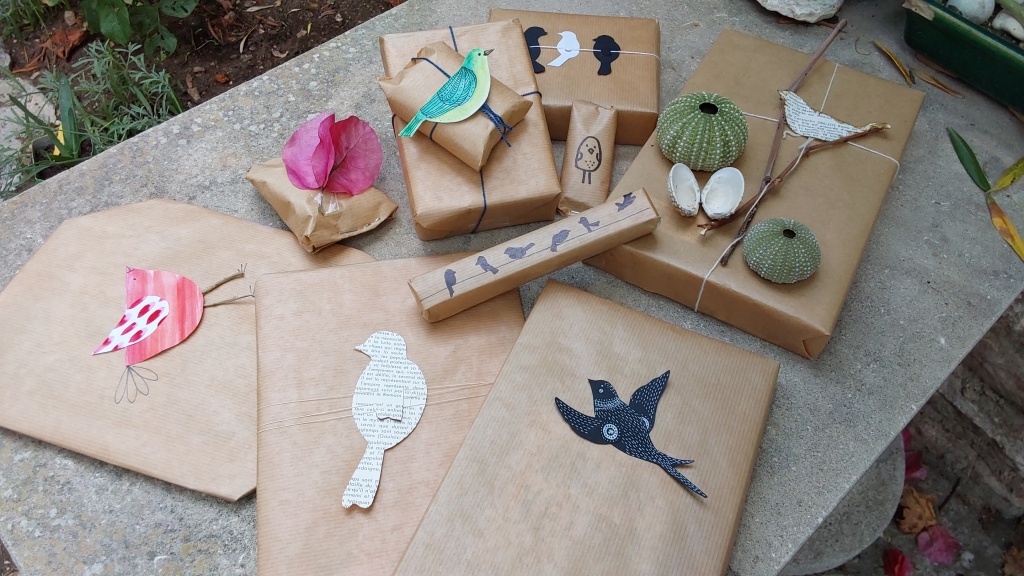
I always wrap their presents at home beforehand – this has the added benefit that the recipients can’t accidentally see what’s inside the gift while I pack and unpack;). I usually use simple brown paper because it takes traveling the best and is the most versatile to decorate later on (and I can draw on it or use it in collage afterward ;). It’s also recycled, recyclable and inexpensive (as well as biodegradable) which is also nice:).

I wrap the gifts but I don’t decorate them at home. If I was to add anything on top before the travel the little decorations would get smushed and peeled off or the gifts would take up much more space – none of that is acceptable when we travel with 3 kids;). So I wrap the gifts in brown paper, put them in a suitcase and that’s it.

But plain brown paper wouldn’t cut it for the gift wrap, right? We have to decorate it a bit – especially for the kiddo;) She loves birds so I decided to go with the bird theme.

If you’ve seen my last video on watercolour exercises I made quite a few collage papers I could use to play around. So I did. I cut out primitive birds from this painted copy paper, from an old book no one needs and added some natural material found on the floor (literally:D), some doodles with a black and white pen, and a string from a big bag of flour that we carried with us and that was it.

The reason I’m writing this is to encourage you to see things differently – little things on the floor can be beautiful ornaments, a plain brown paper can be the best background to play with, and gift wrapping can be fun and very inexpensive – tailored to the recipient and made from solely recycled and natural materials – and it will still look good! You don’t need to sacrifice the beauty and joy of kids’ unwrapping gifts if you don’t want to buy fancy and often unrecyclable papers;) – gift wrap is often plastic coated.

The last gift was a scrunchie and I found this gift wrap idea on Pinterest (where else;) – so I just painted a girl on a piece of card from pasta (yes, we eat A LOT of pasta, I always have cards from boxes of pasta – Barilla has nice white or recycled brown inside – very useful bytheway:). And she was so happy! This was all literally made from scraps – we don’t need that much to be happy – not even teenagers;). Everyone says teens just want money but my teens said they would be so disappointed if they got money from me. They are strange creatures and prefer old pasta boxes and scraps of fabric I guess :D. Maybe you have some strange creatures in your life – who knows – try it with a brown paper bag and some natural materials;).
Gnome Day

Yesterday it was gnome day – as any of you, returning readers, probably already know – we’re quite into gnomes here – especially the middle one, she has always been crazy about gnomes.
*Apologies to all the linguists – I will talk abound gnomes and elves because our language doesn’t know the difference that well.

So, naturally, I draw a lot of gnomes… Especially the red ones (her favourite;). This one was from Inktober.

But I turn other creatures into gnomes as well;).

Gnomes also fill my bujo a lot – I did a gnome theme for quite some months in a row…

Every month they were in different colour…

But we don’t just draw gnomes – we also make them – kids have a rainbow of them but we always make more…

Here are the first gnomes I ever made – when my middle one was 2 years old – and the love hasn’t died – I think the last gnomes just like these I made her last year (she’s 14 now;). We have made so many nature corners with gnomes…

What do we do with gnomes? Well, when kids were little they played with them. Now, they make stop motion some times and we put them into nature corner – here’s the whole family: one is made from wool rowing, felt and wire, one from pine cone and the little ones have wooden bases.

Gnomes are very related to flower fairies and flower children and these are hollow, like finger puppets – that’s another way you could make and use gnomes.

If you make gnomes, make them some things for their house – like a well for water;).

If you have little kids in your life, make them a gnome sensory box – this was happiness overload!

And if you have a gnome lover in your life, make some gnome tags to embelish the gifts…

Speaking of gifts, these were gnomes that we made for the school fair – the kids sell them their and the money goes to school fund for unprivileged kids. They were all sold immediately:).

Speaking of sewing gnomes – I made our gnome lover a gnome outfit – that she loved so much that I had to patch and elongate so that it still fits her! I thought by now, she wouldn’t want to be seen in this but this child is special like that and she still loves it – go figure!

And this was a toy elf (he has a hat and boots, too) – sewn like a Waldorf doll and quite a big toy – she wished for that for a while before the elves from grandpa Frost had the time to make it…

Speaking of grandpa Frost – he has elves that help him – and we have elves that come alive in December if they are placed on their advent calendar truck…

Than they hide and do all kind of stuff – from baking cookies to writing to grandpa Frost their wishes…

I wonder when those traditions fade away… I thought we’d be over by now:D

And here’s one of the best gnome “activities” we do – although it’s not an activity at all – it’s like a meditation for kids – and because the story of the guided meditation includes a gnome, the kids say “let’s make a gnome”.

Based on all the gnomy stuff I see around I think we’re not the only gnome-loving family so I hope somebody will benefit from any of these ideas:). Have a nice gnome day!

Fairy Garden Accessories

Happy Mail on the Budget

I’ve shown you what you can turn trash into on Friday but thought maybe someone would like a list of inexpensive things we can make or upcycle or add to your happy mail without breaking a bank:

- tags cut from pretty packaging (I like tea boxes because they have such nice designs but any beautiful sturdy cardboard would work
- cards made from offcuts – you know when you have some left over pieces when you make an art journal or sketchbook or just cut your big sheets of paper to size and have some offcuts on the side – you can turn those into little cards
- teabags – it’s a nice addition and we all have some tea at home – it’s also nice for your pen pal to taste something you drink:)
- little envelopes made from stamped, printed or painted copy paper – we all have some plain paper at home but with a little bit of care we can make it into something beautiful:)
- vintage paper thingies from your grannie – many pen pals collect vintage things so they might like something from the past era that you might not even think twice about. You can include sewing needles in original boxes, ledger paper, music sheets, vintage stickers (they might not stick anymore but they can be glued on with a glue stick), vintage papers, letters,… It’s fun to see those written in another language and with that beautiful handwriting that our grannies had…
- handmade collage papers: copy paper is perfectly suitable for making collage paper, so is deli paper and tissue paper and they are all very affordable. You can paint it, stamp it, marble it, print it (with gelli plate or other type of mono print since most of us don’t have a press at home;)).
- handmade postcards: you can see here how they are made – those are painted but you can also stamp them if painting is not your forte. Or collage them or marble them or… We have been making handmade postcards for our friends for decades now. Every year we send them from summer holidays and always use a different technique. So far we haven’t run out of ideas so you’re safe here – even kids can do it and people really like them:).
- embossed packaging – if you find a nice single colour on some cardboard packaging you can emboss it with your embossing folders and voila, you get something unique that your pen pal can use:). I usually do that with carboard cans that hold instant barely drink (or coffee) – they really emboss gorgeously with the silver lining!
- blank (unwritten) postcards or even promotion stickers if they have a nice design

There are many more ideas, from DIY stickers and cut-outs to hand painted envelopes and children’s games… But I always write too much as is so I have to remind myself not everybody wants 100 ideas in one single post :D.

Unique Easter Gifts

I’m pretty sure most of you know more about the Easter than I do and you have probably seen so many egg dying techniques that it’s hard to decide which one to try… so I will attempt something a bit different: let me present you a less know tradition and some unique Easter gift ideas:).

The first are hot cross buns. These are delicious sweet bread buns that people in England traditionally eat on Good Friday. They are now associated with Easter but originate in ancient and pagan times when the four sections divided by the cross represented the four seasons. They are not known here but we love them – they melt in your moth and should be eaten immediately (at least according to my family;).

We have the Easter bunny who brings gifts into little baskets and hides them around the house. Traditional gifts include Easter eggs (but non of us is a fan of hard boiled eggs – so the bunny often brings blown-out Easter eggs;)), chocolate eggs (but we prefer “the real chocolate” and non of us is a fan of plastic things found in there) and the little rich bread sweets are usually eaten immediately so they don’t make it to the baskets.

So here are some unique gift ideas that the bunny can bring to your kids or other loved ones:
– handmade toys – either amigurumi (crocheted little toys) or knitted (the bunny on the second picture) or sewn… our bunny has tried them all and kids always love them!
– cleaning supplies: yes, you can give sponges as a gift! Choose some fun ones in bright colours or with a cute pattern – our kids always love that! Same goes for a fun toothbrush, nailbrush and so on… People in general (not just kids) usually really like those kinds of gifts because they are practical and fun – and not something that would end up laying around and collecting dust. Bonus of giving it to kids is that they like to help cleaning for a while:)
– art supplies: pencils, markers, crayons, chalks, sidewalk chalks,… those are pretty inexpensive and get used up quickly. Sideway chalks are especially welcome this time of year because kids will for sure use them during the summer break:)
– Easter decorations: little pipe-cleaner chicks, tiny nests made from straw or tiny twigs (sometimes you can find them in craft stores), flower fairies and so much more…
– homemade sweets in egg-shaped boxes or egg shaped cookies,…

I hope you found an idea or two worth trying and I wish you the happiest Easter with a lot of unique gifts and a lot of laughter of recipients:).
Egg with Green Hair

I know this one is a classic but it’s such a nice little activity that anyone can do – ok, maybe not vegans – but other than that almost anyone;). I love the easy little nature crafts that let kids have some hand-on connection to nature and this one even has a wow factor:) Honestly, I think I’ll do it even when my kids will move out – they are in their teens now and we all still enjoy it so… I guess some people just don’t grow up – unlike the hair on this project;).

What you’ll need:
– eggs
– cotton wool or cotton pads or a peace of kitchen sponge
– seeds for sprouts
– water
Instructions – video here:).
When you make something from eggs, save the shells for this little project. You can try to make one part of the shell a bit bigger but that’s not necessary. You can wash the shells if you want but that’s not necessary either (it will give more nutrients to your seeds in fact if you leave those few drops of egg white in). Put the shells in little egg pots or egg carton so they won’t tip over and will be easy to move around.
Than, stuff the egg shells lightly with cotton wool.
Pour some water on it and sprinkle with tiny sprouting seeds like cress, mustard, radish… The best suited seeds are the ones that are selected especially to make sprouts to eat. Of course, you can make this project with any seed that fits the shell but it’s nice if they are tiny so there can be more of the little sprouts -> more hair on your egg:).
Then water the seeds a bit more (you can also use a spray bottle if there’s enough water already. Repeat that in the following days since the seeds should be wet at all times during the first few days. The first day or two you can keep them in the dark and later put them to the light.
*Bonus tip: If you want them to grow fast it helps if the temperature is higher. You can achieve that by making an improvised “hotbed” for your seedlings – I just covered mine with a lid for microwave – we rarely use microwave so it’s not a problem:).
Happy EASTER!
